Saturday 14 November 2015

Panel and Paint - update

Just a quick update.

Last week I dropped the car off to a friend's shop to continue prepping for paint. Today I finished off the strip down before it receives primer. The bumpers, handles, lights, and trims were removed and the double sided tape from the trims removed with a caramel wheel.

I kinda like the look of the side shirt and rear door pod without the door trims in place.


Tuesday 10 November 2015

Panel and paint

The paint on the old girl was mostly original, besides the minor front end paint job, and is what you could call 'honest'. Dents, scrapes and the lingering signs of some intimate parking. 


Over the past 6 months, I've been spending some time in doing some much needed body repairs. The roof, bonnet and driverside rear quarter had received the majority of the 27 years of wear. The worst of these indiscretions were discussed in my blog entry 'Dents, Scrapes and Other Body Damage'.


The bonnet and roof received the most attention, due to the damage they had. 


A large dent resulted in some major ripples through the driver side rear guard even after the dent was massaged out. Too many hours went into correcting this.


Today, I did some final prep before it went off for final paint work, all door moldings, badges and unnecessary trims were removed before the car was driven to a mate who is painting the car.

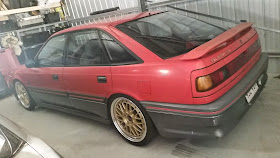
As she stands before primer and paint.


A mate of mine was looking to get rid of some un-needed parts from his collection, to which I was happy to oblige. The old girl now has a pair of new tail lights.
 
New tail lights!
 
I'll be heading over the help with final strip down on Saturday before it gets rolled into the booth in the next week or so. I can't wait!

Wednesday 9 September 2015

Understanding Telstar VIN and Build Plates


The VIN (Vehicle Identification Number) and Build plates gives the identity and build details of any specific car. Today all manufactures us an International standard 17 digit VIN, which have codes to represent the World Manufacturer Identifier (WMI), Vehicle Descriptor Sector (VDS) and the Vehicle Identifier Section (VIS).


The International Standard VIN was not enforced until the 1st January 1989, when all vehicles sold in Australia needed a 17 digit VIN to be eligible for registration. Further information on this can be found at the following:


Mazda and Ford used a 17 digit VIN but it is not a standardised sequence as per other manufacturers. The AT models (built Oct 87 - Dec 89) have a 17 digit VIN and there is a lot of Ford produced technical references to support this, however the early AT TX5 Turbos did not use them.

This is out of my 1989 Workshop Repair Manual, showing the VIN type of the Australian Delivered cars and all other Right Hand Drive models.


 Below is the breakdown for vehicles built for the Australian Market.


The Build plate is located on the bulk head of the Firewall. All Australian delivered AT/AV Telstars are all labeled as GD Models on the Build Plates. GD is the chassis designation for the Mazda equivalent. The AAA in the VDS is described as being all vehicles produced from Nov 1991, however this identifier was used as early as 1989 as per below.


The JC0 and the AAA was not used on early AT TX5 Turbo model build plates. Instead they used the SHW as the VDS with the remained being the VIS as per the international standard.


The VIN can also be found stamped into the bulk head of the fire wall.


Below is a breakdown of an early AT TX5 Turbo VIN, indicating what each digit represents.


The Year and Month charts can be used to verify built dates. in the above example, J and C are the year and month as seen under Built Date. 
 This is an extract from the Ford Body Repair Quotation Guide and can be used to verify Build dates:

"The chart set out below interprets the production year and month codes. The letters I, O, Q and Z have been excluded from the system to avoid possible misinterpretation of similarity with other letters. The monthly codes set out as follows are recycled every fifth year."

from the Ford Body Repair Quotation Guide

The Compliance plate is also located on the bulkhead of the fire wall, above the brake master cylinder and booster assembly. The ADR compliance plates were fitted to the vehicles once they had passed all requirements. It is not uncommon to see the compliance dates stamped a month after build date. They still retain the VIN as per the Built plate.


The AV Model build plates differ, in that they have the 17 digit VIN. The ADR Compliance plates also differ, in that they list the Approval number, the Category, but not the individual ADR numbers. 

Below is an example of this as well as the build plate from my old 1990 TX5 Turbo.


If you would like me to decipher your VIN/ Build plates, feel free to contact me.

Friday 28 August 2015

New plates

After my old TX5 had personalised plates,  I thought it was fair that this one did too.

Here in Queensland, to get personalised plates, you do it online though Personalised Plates Queensland. Their website is PPQ.com.au. the website allows to enter the combo you'd like and it lets you choose plate styles and availability.


After much deliberating and discussion with a few mates, I decided to go with some plates that matched the car. I really wanted to go with number plates that had 2 letter and 3 numbers, TX5 88. Unfortunantly the combo of 2 letter and 3 numbers is not available for purchase.


To keep with the TX5 theme, I went with the combo of TXS•88. I went with the diamond to separate the model from the year.


On the car, the plates look great and I'm happy with the look.


Tuesday 26 May 2015

Ksport Coilover installation

Once my coilovers had arrived, i was a little disappointed that the rear coilovers had rubber bushed solid strut mounts instead of adjustable camber plates. Rear camber can still be adjusted via the lower hub mounts.


After a bit of research, I had learnt that S13 silvia front camber plates shared the same upper stud mounting and in the correct orientation. I went on the hunt to find some camber plates to convert my new coilovers.


 I found a pair of adjudtable ISC camber plates for $40, the only issue was that the centre hole in the spherical bearing was 18mm instead of 14mm. I considered sleaving the bearing, but changed my mind once I found the bearings to be seized. The other issue is that I didn't have a suitable upper spring perch.


I happened to have some old D2 front coilovers which I was able to use the 14mm spherical bearing and upper spring perch with the Ksport coilover and ISC camber plate. The orange plate is Ksport, the purple is the D2's and the yellow is the ISC camber plate.


Adding the spherical bearing and spring perch resulted in the upper spring mount now being 15mm lower than with the solid aluminum top mount. To ensure the spring preload remained the same, the lower mount was moved 15mm lower.


Once they were all back together, it was time to install them into the car. The car was jacked into the air and placed on chassis stands.


Whilst in the air, it gave me an opportunity to check out the 26 year old sills and underside. The sills, lower pinch rails and  jacking points were in perfect condition. The inner guards and rails were also in excellent condition with no signs of damage, rust or repair. I also found that the rear jacking point has a sturdy brace behind the pinch rail which matched the profile of my chassis stands. 

Removing the original struts was straight forward and pain free. Almost every bolt looked untouched and was easy to remove. the Ksports were fitted up to the with guestimated height and camber settings. Once the car was on the ground with the BBS LM's trial fitted, it was looking great, however the car was way too low.


I've since made height adjustments twice. Measure the current and desired ride height and calculate the required hub mount change. Very much a calculated trial and error technique, but it does work.
 

I took the car for a spin around the block and the ride is fantastic. I can't wait to take it for a spirited drive.

Momo Cobra

In Japan, the TX5 was offered with a few different options, one included a Momo Cobra II steering wheel. 


The Cobra II wasn't an overly popular steering wheel and not many survived the 25 odd years. The original Momo Cobra was more popular and so there are more of them available, if you know where to look.  These were manufactured in Italy in the mid 80's though to the early 90's. A lot of these came as factory options on s lot of Japanese sports cars, ranging from Toyota's MR2 though to the top of the range TX5 2000DOHC GT Francorchamps [4WS].


Wednesday 18 March 2015

Ksport and SuperPro delivery.

So Things have been pretty quiet with the Telstar, but a lot has happened since my last post.Lots of parts have arrived for the Telstar.


The Ksport coilovers finally arrived, as did my SuperPro bush kit. The coilovers are nicely made and look to be very sturdy. Being the street edition coilovers, they use steel bottom mounts instead of aluminium. They also have rubber mounted strut tops also. The rubber mounting and steel bottom mounts do add some additional weight over the all aluiminium and spherical bearing strut tops. 


The rear strut mounts are rubber centred solid aluminium plates and camber adjustments are made at the hub with an elongated top mounting hole.